


Rx Instructions for Lab Processed Temporary Bridge
Posted on 10/04/2011
For lab processed temporary bridges, we recommend that the doctor send the lab upper and lower unprepped models and a bite registration. The doctor can take either an alginate impression (poured in office) or a rigid impression material such as PVS or impregum.
Although labs should already be aware of the following points, we recommend that the doctor specifically list these instructions on the Rx to avoid any miscommunication.
1. Duplicate the working model. This allows the doctor to have a pre-prep study model in case he does not have one in the office.
2. Prep the model conservatively. We recommend 1.5mm circumferential reduction of all indicated teeth.
3. Indicate if a "shell" design is requested. A shell temporary refers to a temporary bridge where there are no internal embrasures delineating individual teeth (see photo below).
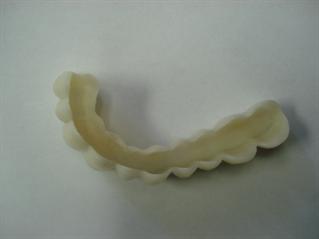
This allows for easier seating and chairside reline without grinding necessary. It is really an ideal design for long span bridges. Additionally, it is often difficult for doctors to match lab preps exactly, so a shell design helps to avoid tedious prep matching and binding issues. The downside is that the doctor may not always have the same color acrylic as labs, in which case the different shades may show if the acrylic shell is thin.
4. If not using a shell, ask for a thermoplastic prep guide. A thermoplastic prep guide is similar to a thin retainer (like an Invisalign retainer) constructed over the lab prepped model. It allows the doctor to check his preps before inserting the temp. Because it is clear, the doctor can continually check where it may be binding to allow for the easiest prep match before inserting the temporary bridge.
Although labs should already be aware of the following points, we recommend that the doctor specifically list these instructions on the Rx to avoid any miscommunication.
1. Duplicate the working model. This allows the doctor to have a pre-prep study model in case he does not have one in the office.
2. Prep the model conservatively. We recommend 1.5mm circumferential reduction of all indicated teeth.
3. Indicate if a "shell" design is requested. A shell temporary refers to a temporary bridge where there are no internal embrasures delineating individual teeth (see photo below).
This allows for easier seating and chairside reline without grinding necessary. It is really an ideal design for long span bridges. Additionally, it is often difficult for doctors to match lab preps exactly, so a shell design helps to avoid tedious prep matching and binding issues. The downside is that the doctor may not always have the same color acrylic as labs, in which case the different shades may show if the acrylic shell is thin.
4. If not using a shell, ask for a thermoplastic prep guide. A thermoplastic prep guide is similar to a thin retainer (like an Invisalign retainer) constructed over the lab prepped model. It allows the doctor to check his preps before inserting the temp. Because it is clear, the doctor can continually check where it may be binding to allow for the easiest prep match before inserting the temporary bridge.


